Released 24 May 1998


We accept Mastercard/Eurocard/Maestro/JBC and Visa!
Tip of the month is edited by Peter Ring, PRC (Peter Ring Consultants, Denmark)
- consultants on how to write user friendly manuals
If you have corrections, better texts or suggestions for improvements, please let me know.
But Julie is not the only person with this problem. And the explanation is difficult to give without showing examples. Therefore this month's tip.
Screen captured images are always bitmaps. And resizing bitmap images will almost always result in reduced viewing quality. Vectorised images don't have that problem, but that's another story.
There are basically three ways of resizing bitmap images:
If you have problems with changing your screen resolution frequently, please note, that many video cards are delivered with software for fast and easy change of the screen resolution. If not, and if you are using Windows 95, "PowerToys" - freeware (!) and downloadable from Microsoft's website - contains a small programme, QuickRes, permitting instant change of screen resolution.
If downsizing, some thin lines may disappear because - depending of where it is placed on the image - a 1 pixel wide vertical line may remain a 1 pixel vertical line or a 0 pixel vertical line (= no line). Furthermore, wider lines will not get the same width all over the screen depending of their position on the screen. Many letters and other characters are displayed using 1 pixel lines.
This can to some extent be repaired manually by painting on the reduced image, e.g. reinserting disappeared lines. This is a very time consuming process (order of magnitude one hour per image), but the result is a great improvement.
A better and much faster possibility is anti aliasing, which may be combined with sharpening.

(Click here
for more info about TrimTXT)
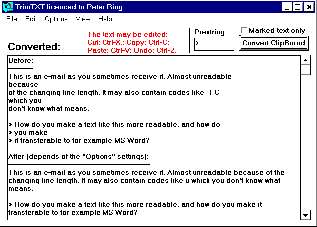
Resampled 1:2, without repair or anti aliasing:
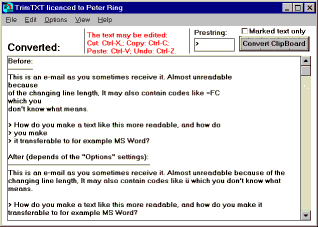
The same file, manually repaired without anti aliasing. Note the difference in readability (especially the menus) and e.g. the frame next to the button:
 .
.
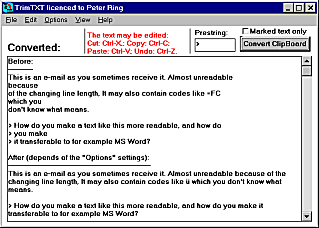
Another resampling repair technology is "Anti aliasing". Anti aliasing uses (coloured) greytones to simulate fractions of pixels. This works fine with high resolution colour schemes like 16 bit (65536) colours or better. It don't work at all if you use 16 colours and only partly (note the colour shift of the right side slider) if you use 256 colours. The GIF format includes max. 256 colours. Furthermore, many people have their screen set to 256 or even 16 colours, which means they don't get very much out of the anti aliasing improvements. Therefore, if you use dithering, use the 16 bit colour format like JPEG/JPG and recommend people to switch to at least 16 bit colours. Here is the same file resampled in 256 colours by Corel Photo-Paint (Photoshop and other high-end photo programmes can do it, too.) using anti aliasing:
After resampling with anti-aliasing, the image may be further improved by sharpening. Here is the same 256 colour GIF image, handled by the new Paint Shop Pro 5, downloadable (30 days demo, 7MB) from JASC . It was first changed to 24 bit colours, then resized to 50% with anti-aliasing (type: "smartsize"), then sharpened (type: "sharpen more"), and finally reduced back to 256 colours:
As you see, significantly crispier! And when made as a routine, this procedure takes approx. one minute per image.
Further refinements can still be done manually, but repairing anti-aliased images is fairly difficult.
Which one you prefer is a matter of taste. I find the last one the best one, but there is a loss and there always will be.
Anti-aliasing is often confused with dithering, although it's something completely different.
"Dithering" substitutes the correct colour by a mixture of two colours when decreasing its number of colours. A good example is the skin colour on the person in the little animated GIF at the entrance homepage of the "User Friendly Manuals' Website ". The skin colour is a 256-colour Windows colour, decreaced to 16 colour level by dithering in order to significantly decrease the filesize of the animated GIF. It further makes it possible to see the image properly with a 16 colour screen. If not dithered, the skin colour on a 16 colour screen would have been awful!
In most programmes, this may be done by dragging e.g. the corners of the image with or without holding down the Ctrl and/or Shift buttons down for constant H/W ratio.
In HTML for e.g. Internet applications it is done by means of the "WIDTH =" and "HEIGHT =" tags. Example:
When printing to paper, transparencies, etc. the printing technology (PostScript/PCL/...) and the printer resolution (300/600/1200/.. dpi), determines the quality of the image. In general there is no gain by using more pixels per inch in the file than the printer resolution, and often you can go down by a factor of 1.5 to 3 without any significant reduction in the quality. This is especially the case with colour PostScript printing.
"Resolution" or "density" is an information saved with some bitmap formats, e.g. BMP, JPG, PCX, TIF, and WPG, but not e.g. GIF. Resolution indicates the number of bits per inch when inserting in a document or printing directly. Changing resolution does not change the number of pixels and consequently the size of the file in bytes remains unchanged. When inserting a bitmap in e.g. MS Word or printing an image directly from a drawing programme, resolution determines the size of the image related to "100%" image size. Example: A 600x480 pixel image will get the following size:
Ideas for new "Tip of the month" subjects are VERY welcome, too!
Go to
last month's tip
.
Go to a list of old tips
.
Return to the User Friendly Manuals' homepage
.
.
.
.